View Groups, Lists
view groups that not only layout and organize their child views or widgets but also provide additional functionality. In other words:
- Widgets are simple views, usually displaying one "thing" and often allowing user interaction. Classical example is Button
- Layouts are views that organize other views but are not directly visible and do not interact directly with the user. Classical example is LinearLayout
- Complex views are views that organize other views into some layout but provide additional functionality as a whole. Classical example is ListView
Frequently used classes that are considered complex views are:
- Gallery: a horizontally scrollable list of items with one center item in the middle
- GridView: a grid of items
- ListView:a vertically scrollable list of items
These views use an "adapter" as storage for its elements (more soon). Other complex views are:
- ScrollView: provides scrolling capabilities to another view
- TabHost: container for other views that contains a tab for the user to click and select it
- ViewSwitcher, ImageSwitcher, and TextSwitcher: allows an animated transition between two views
- SlidingDrawer: contains view that can be sliding up and down
Adapter Views: Gallery, GridView, ListView
As we mentioned, Gallery, GridView, and ListView display data from a data source bound to their view via an Adapter. The most common adapter classes are CursorAdapter (for example for data coming from a database) and ArrayAdapter(for data stored in an array or list). Four pieces need to go together: the data, a description of how to render one data element, a view to describe the layout of the collection of items, and an adapter to mediate between the group view, the individual view, and the data.
ArrayAdapter
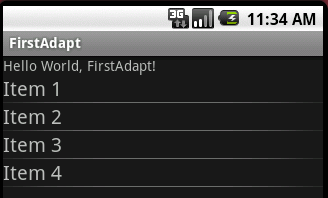
To see how everything fits together, create a new Android 1.5 project named FirstAdapt. Goto the layout folder inside the res folder. Highlight the main.xml file, select "Edit | Copy", then paste it into the same folder, but ame the copydataview.xml. Open the copied file dataview.xml, delete all views it contains, then add a single TextView with id = @+id/TextView, Layout width = fill_parent, Layout height = wrap_content, Text size = 20sp and nothing as Text. Save your file.
Next, open main.xml and add a ListView after the existing TextView inside the LinearLayout. Set parameters Layout widthand height to fill_parent and choose as Id @+id/ListView. Save your work. The two XML files, when you look at their source, should look like this (the properties might be ordered differently in your version):
dataview.xml
<?xml version="1.0" encoding="utf-8"?>

<TextView xmlns:android="http://schemas.android.com/apk/res/android"
          android:layout_height="wrap_content"
          android:layout_width="fill_parent"
          android:textSize="20sp"
          android:id="@+id/TextView">
</TextView>
main.xml
<?xml version="1.0" encoding="utf-8"?>
<LinearLayout xmlns:android="http://schemas.android.com/apk/res/android"
    android:orientation="vertical"
    android:layout_width="fill_parent"
    android:layout_height="fill_parent"
    >
    <TextView android:layout_width="fill_parent"
              android:layout_height="wrap_content"
              android:text="@string/hello"
     />
     <ListView android:id="@+id/ListView"
               android:layout_height="fill_parent"
               android:layout_width="fill_parent">
     </ListView>
</LinearLayout>
Now you have all the UI elements needed to render your data - but you still need to create your data, the adapter, initialize the views, and link everything up. So, open the source code file FirstAdapt.java and enter the following code:
public class FirstAdapt extends Activity
{
 // define the data as an array of Strings
 private String items[] = {"Item 1", "Item 2", "Item 3", "Item 4"};
 // define  adapter and view as fields to be initialized later
 private ListView list = null;
 private ArrayAdapter<String> adapter = null;

 public void onCreate(Bundle savedInstanceState)
 {
         super.onCreate(savedInstanceState);
         setContentView(R.layout.main);

         // initialize the adapter with the ListView defined in dataview.xml
         // and the array of String items defined in code
         adapter = new ArrayAdapter<String>(this, R.layout.dataview, items);

         // initializing the list from main.xml
         list = (ListView) this.findViewById(R.id.ListView);
         // getting the list view to use this adapter
         list.setAdapter(adapter);
 }
}
The remaining two adapter-based views are Gallery and GridView - but they can use the same adapter and data! Same data (and adapter) but different views of the data!
Let's represent the data as a grid: Open main.xml, remove the ListView and add instead a GridView. Set its Id to @+id/GridView, the Layout width and height to fill_parent, and the Num columns to 2. Now replace all references to "list view" in the source code by a "grid view" and run the app again, without changing the data or the adapter.
Finally, we can replace the GidView by a Gallery in main.xml, change the source code accordingly, and we can view the data as a gallery of horizontally scrolling elements. Note that the items can scroll horizontally, but each item takes up the whole width of the screen, because the TextView in dataview.xml used to render one item still has Layout width set to fill_parent. Change that Layout width to 100sp and run the app again to see everything look pretty nice.
 | 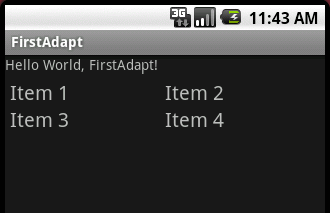 | 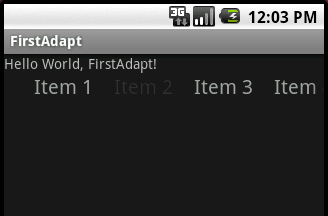 |
| list view | grid view | gallery view |
Dynamic Lists and ListEvents
In the above example the elements in the list did not change - the list was static. In a dynamic list on the other hand items can be added or removed from the list at runtime. To implement a dynamic list you can not (or should not) use an array of items, since an array has a fixed size. Instead you can use one of the Java list structures such as an ArrayList or aVector. Much of the rest of the programming is similar to before, but you need to notify the ListView whenever a change in the list data occurs so that it can update its view.
While we are at it, we are also including some coding example for how to handle list-selection evens. We'll show a program that:
- contains a list of String items
- contains an "Add" button and a text field to contain a string to be added
- lets you select items from the list and shows you the selected item

We should really also include a method to delete items from the list, but we'll postpone that to the next segment on dialogs and menus.
First, create a new project named FirstAdaptDynamic and layout a title, an input field, a button, and a list view as shown. Also create a new XML file to describe a TextView as template for the list elements, just as we did above. For your reference, the XML files are listed below.
main.xml
<?xml version="1.0" encoding="utf-8"?>
<LinearLayout xmlns:android="http://schemas.android.com/apk/res/android"
    android:orientation="vertical"
    android:layout_width="fill_parent"
    android:layout_height="fill_parent">

 <TextView android:id="@+id/TitleView"
     android:layout_width="fill_parent"
     android:layout_height="wrap_content"
     android:text="Dynamic List Example"
     android:textSize="24sp"
     android:textStyle="bold"
     android:gravity="center">
 </TextView>

 <TableLayout android:id="@+id/TableLayout01"
  android:layout_height="wrap_content"
  android:layout_width="fill_parent"
  android:stretchColumns="0">
  <TableRow android:id="@+id/TableRow01"
   android:layout_height="wrap_content"
   android:layout_width="fill_parent">

   <EditText android:id="@+id/AddField"
    android:layout_height="wrap_content"
    android:layout_width="wrap_content">
   </EditText>

   <Button android:id="@+id/AddButton"
    android:layout_width="wrap_content"
    android:layout_height="wrap_content"
    android:text="Add">
   </Button>
  </TableRow>
 </TableLayout>

 <ListView android:id="@+id/ListView"
  android:layout_height="fill_parent"
  android:layout_width="fill_parent">
 </ListView>
</LinearLayout>
dataview.xml
<?xml version="1.0" encoding="utf-8"?>

<TextView xmlns:android="http://schemas.android.com/apk/res/android"
 android:id="@+id/ListItemView"
 android:layout_width="wrap_content"
 android:layout_height="wrap_content"
 android:textSize="20sp">
</TextView>
With the layout defined, let's go to the source code. First, we create a program similar to beore but with an ArrayList instead of an array to store the list items.
public class FirstAdaptDynamic extends Activity
{
 // define the data as an array of Strings
 private ArrayList<String> items = new ArrayList<String>();
 // define  adapter and view as fields to be initialized later
 private ListView list = null;
 private ArrayAdapter<String> adapter = null;

     public void onCreate(Bundle savedInstanceState)
     {
         super.onCreate(savedInstanceState);
         setContentView(R.layout.main);

         // add some items to the adapter
         items.add("John Dear");
         items.add("Jane Doe");

         // initialize the adapter with the ListView defined in dataview.xml
         // and the array of String items defined in code
         adapter = new ArrayAdapter<String>(this, R.layout.dataview, items);

         // initializing the list from main.xml
         list = (ListView) this.findViewById(R.id.ListView);
         // getting the list view to use this adapter
         list.setAdapter(adapter);
     }
}
That creates an app with a static list as before. To enable the button to add the content of the text field:
- Define the button and the input field as fields:
// define the add button and field
 private Button addButton = null;
 private EditText addField = null;
- Define a button handler as an inner class. It retrieves the text from the input field and adds it to the item list (which was dynamic). Then - important - it notifies the view through the adapter that the underlying data has changed by calling adapter.notifyDataSetChanged() so that the list knows it needs to redraw. If you do not include this call, the view would not update to reflect the new item.
// define the button handler
 private class AddHandler implements View.OnClickListener
 {
  public void onClick(View v)
  {
   String newItem = addField.getText().toString();
   items.add(newItem);
   adapter.notifyDataSetChanged();
  }
}- Set the handler as event handler for the button:
// attaching the listeners
        addButton.setOnClickListener(new AddHandler());
Now we can add items to the list. Note that the list will automatically get scrollbars when necessary. There are a few improvements possible, all left to you:
- the item should be removed from the text field after it has been added to the list
- the handler should check to tot add an empty string to the list
- if you hit ENTER inside the text field, it expands to two lines -it should not, instead pressing ENTER should be the same as clicking the button
- items are added to the end of the list and could scroll out of sight. Either add them at the beginning or scroll the list to the last item added
Last, we define a handler to listen to "list selection events". If it notices one it will display the position of the item that was clicked by the user. The principle is the same as for buttons: define a handler class and attach it to the element whose events to intercept:
- Define an appropriate handler. In this case it simply shows the position of the item selected from the list in a short toast. You could easily extract the element from the ArrayList of items at that position and display that (try it):
// define the list selection handler
 private class ListItemSelectedHandler implements AdapterView.OnItemClickListener
 {
  public void onItemClick(AdapterView<?> adapt, View view, int position, long id)
  {
   Toast.makeText(FirstAdaptDynamic.this, "Selected item " + position,
                                       Toast.LENGTH_SHORT).show();
  }
}- Attach the new handler to the list view
// attaching the listener
        list.setOnItemClickListener(new ListItemSelectedHandler());
That should give you a pretty complete list-handling program you can experiment with. To add to the functionality of this program, we will introduce how to work with menus and dialogs next. You could already try to enhance your program to handling "long clicks" on a list item, at least by displaying the item long-clicked on.
Layouts


Widgets & Other Views


User Interface
In an Android application, the user interface is built using
View and ViewGroup View class.View objects are the basic units of user interface expression on the Android platform. The View class serves as the base for subclasses called "widgets," which offer fully implemented UI objects, like text fields and buttons. The ViewGroup class serves as the base for subclasses called "layouts," which offer different kinds of layout architecture, like linear, tabular and relative.
A View object is a data structure whose properties store the layout parameters and content for a specific rectangular area of the screen. A View object handles its own measurement, layout, drawing, focus change, scrolling, and key/gesture interactions for the rectangular area of the screen in which it resides. As an object in the user interface, a View is also a point of interaction for the user and the receiver of the interaction events.
View Hierarchy
On the Android platform, you define an Activity's UI using a hierarchy of View and ViewGroup nodes, as shown in the diagram below. This hierarchy tree can be as simple or complex as you need it to be, and you can build it up using Android's set of predefined widgets and layouts, or with custom Views that you create yourself.

In order to attach the view hierarchy tree to the screen for rendering, your Activity must call the
setContentView()The most common way to define your layout and express the view hierarchy is with an XML layout file. XML offers a human-readable structure for the layout, much like HTML. Each element in XML is either a View or ViewGroup object (or descendant thereof). View objects are leaves in the tree, ViewGroup objects are branches in the tree (see the View Hierarchy figure above).
The name of an XML element is respective to the Java class that it represents. So a
<TextView> element creates a TextView in your UI, and a<LinearLayout> element creates a LinearLayout view group. When you load a layout resource, the Android system initializes these run-time objects, corresponding to the elements in your layout.For example, a simple vertical layout with a text view and a button looks like this:
<?xml version="1.0" encoding="utf-8"?> <LinearLayout xmlns:android="http://schemas.android.com/apk/res/android" android:layout_width="fill_ parent" android:layout_height="fill_ parent" android:orientation="vertical" > <TextView android:id="@+id/text" android:layout_width="wrap_ content" android:layout_height="wrap_ content" android:text="Hello, I am a TextView" /> <Button android:id="@+id/button" android:layout_width="wrap_ content" android:layout_height="wrap_ content" android:text="Hello, I am a Button" /> </LinearLayout>
Notice that the LinearLayout element contains both the TextView and the Button. You can nest another LinearLayout (or other type of view group) inside here, to lengthen the view hierarchy and create a more complex layout.
A widget is a View object that serves as an interface for interaction with the user. Android provides a set of fully implemented widgets, like buttons, checkboxes, and text-entry fields, so you can quickly build your UI. Some widgets provided by Android are more complex, like a date picker, a clock, and zoom controls. But you're not limited to the kinds of widgets provided by the Android platform. If you'd like to do something more customized and create your own actionable elements, you can, by defining your own View object or by extending and combining existing widgets.
Once you've added some Views/widgets to the UI, you probably want to know about the user's interaction with them, so you can perform actions. To be informed of UI events, you need to do one of two things:
- Define an event listener and register it with the View. More often than not, this is how you'll listen for events. The View class contains a collection of nested interfaces named On<something>Listener, each with a callback method called
On<something>(). For example,View.OnClickListener(for handling "clicks" on a View), View.OnTouchListener(for handling touch screen events in a View), and View.OnKeyListener(for handling device key presses within a View). So if you want your View to be notified when it is "clicked" (such as when a button is selected), implement OnClickListener and define itsonClick()callback method (where you perform the action upon click), and register it to the View withsetOnClickListener() - Override an existing callback method for the View. This is what you should do when you've implemented your own View class and want to listen for specific events that occur within it. Example events you can handle include when the screen is touched (
onTouchEvent()onTrackballEvent()onKeyDown()